Monday, July 29, 2013
3 post
On last lesson I've started doing prototype of my desk tidy from cupboard. While doing that I've realized some things that I had to change and I actually changed them during the process. I changed lengths of the sides so I could use less cupboard. I have 4 small "boxes" where I'm going to put my jewelry. I think I'll finish my prototype next lesson, and when I do-I'm going to put a photo of it on the Blogg.
Thursday, July 25, 2013
2nd post


Tuesday, July 16, 2013
term 3, post 1
On todays lesson we started doing our new assignment which is desk tidy. Firstly we had to do research of different desk tidies and then start planning our own desk tidy. In the internet I found a lot of desk tidies of different shapes and colours. But I need to look at all of the examples and make my own desighn, not copy of someone's design. We firstly had to decide what thigs we were going to put into our desk tidy. I'm going to put there my Iphone, a cup, pencils and pens,and some paper sheets. So I need a desk tidy that can fit in all of these things. Here are some pictures that I found in the internet.
 -I really like this desk tidy because there is a space for the phone, some paper, pens, pencils and small things.
 -I don't really like the design and I think it's too small.
  -this one looks modern, interesting, good for teenager, but there is no place for my phone and a cup, so I don't think this design will be the best for me.
 -This desk tidy includes a lot of different trays for paper, small things,etc. But I don't really like the way it's done and I think that this desk tidy will take a lot of space on my table.
And here are some of my drawings.


slOZw~~60_35.jpg)
And this is my final one, that I really want to make.

Here is my design of desk tidy with a stand for my iPhone, a space for a cup, a box for pens and pencils and a small box for the small things. It also has space for paper at the back. The stand fornthe iphone is small because it doesn't need all 4 walls, so it has just one short wall at the front that will stop the phone from falling. I will also be able to put some paper at the back of the desk tidy and stand for pens and pencils. I also tried to find a desk tidy that have a place for a cup and I decided to place my cap in the middle of the desk tidy. It doesn't have any walls because I need to get it out and put it back as easy as possible.
Wednesday, June 5, 2013
5th post
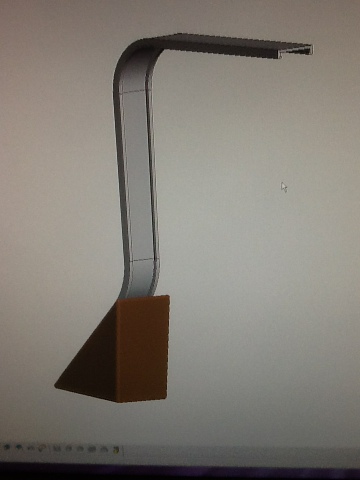
on todays lesson I've finished doing my lamp in the program ProDesktop.
I've done my base, aluminium piece and the LED bulbs and put al the parts together. I had some trouble with turning the pieces and putting them under one angle. But yesterday Mr Andrews showed us how to do it. It was still confusing but I tried couple of times and then I finally got the right angle I wanted and put all the pieces togeter.
this is the picture of my finished lamp


Thursday, May 30, 2013
4th post
On today's lesson we were doing our lamps. I had some trouble with putting two parts together.
I've finished my aluminum piece and timber piece, I needed just to put these two together so that they are connected. But the problem was that they were on different angle and I don't know how to make them be on the same angle. So, on the next class I will have to borrow a book and look it up.
I've finished my aluminum piece and timber piece, I needed just to put these two together so that they are connected. But the problem was that they were on different angle and I don't know how to make them be on the same angle. So, on the next class I will have to borrow a book and look it up.
Term 2 questions.
Design Technology questions.
CAD stands fro Computer-Aided Design
A prototype is an early sample or model built to test a concept or process or to act as a thing to be replicated or learned from. It's important because that us how you can check whether your project is going to work or not. If not, how can you fix it and make it better.
Rapid Prototyping (RP) enables the quick fabrication of physical models using three-dimensional computer aided design (CAD) data. Used in a wide range of industries, Rapid prototyping allows companies to turn innovative ideas into successful end products rapidly and efficiently.
before rapid-prototyping, prototype should be sketched. To see the elementary design of all the details of the machine(project)
Additive manufacturing or 3D printing[1] is a process of making a three-dimensional solid object of virtually any shape from a digital model.
CNC means Computer Numerical Control. This means a computer converts the design produced by Computer Aided Design software (CAD), into numbers. The numbers can be considered to be the coordinates of a graph and they control the movement of the cutter. In this way the computer controls the cutting and shaping of the material.
A STL file is a format used by Stereolithography software to generate information needed to produce 3D models on Stereolithography machines.In fact, the extension "stl" is said to be derived from the word "Stereolithography." The surface of an object is broken into a logical series of triangles. Each triangle is uniquely defined by its normal and three points representing its vertices.
3rd post
On last lesson we were doing our lamps on ProDesktop. I had a bit of trouble with it. I had a small piece on the top of my sketch, which was not connected to other two parts( profile and path) that's why I couldn't make my profile go along the path to create an aluminum piece of my lamp.
But when I saw it and deleted it, everything was good.
That what I got at the end of the lesson.
On today's lesson, I'll probably start doing my timber piece which is a base of my lamp.

But when I saw it and deleted it, everything was good.
That what I got at the end of the lesson.
On today's lesson, I'll probably start doing my timber piece which is a base of my lamp.
Subscribe to:
Posts (Atom)